When it comes to gardening, few plants are as rewarding and versatile as okra. Known for its distinctive pods and vibrant green foliage, okra (Abelmoschus esculentus) is a warm-season vegetable that thrives in various climates. It’s actually a member of the hibiscus family with noticeably similar flowers. Whether you’re a seasoned gardener or a novice enthusiast, growing okra in your garden can be a fulfilling and enjoyable experience.
Beyond the Southern United States, okra finds its way into the kitchens of many cultures, including Indian, Middle Eastern, and Caribbean cuisines. Its unique texture and mild flavor make it a prized ingredient in soups, stews, stir-fries, and pickles.
The versatility of okra extends beyond its culinary applications. It can be enjoyed fresh, frozen, or dried, ensuring a year-round supply of this nutritious vegetable. Additionally, okra leaves and flowers can be used in herbal teas or as a natural thickening agent in certain dishes. Its high fiber content and various essential nutrients make okra a valuable addition to a healthy diet.
Understanding Okra
Appearance
Okra plants are known for their tall and sturdy growth, reaching heights of 3 to 6 feet (0.9 to 1.8 meters) in optimal conditions. The leaves are large and palmate, with lobed edges and a vibrant green color. Okra plants produce vibrant yellow flowers with a hibiscus-like appearance, which eventually give way to the distinctive elongated pods.
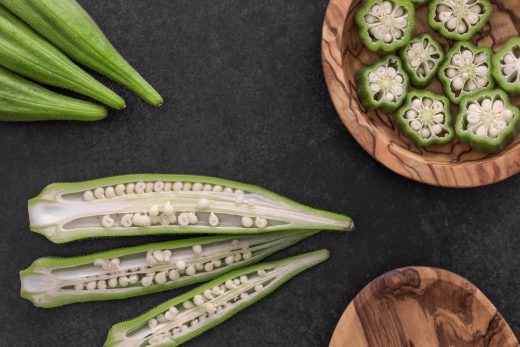
The pods, the main attraction of the okra plant, are typically 3 to 6 inches (7.6 to 15.2 centimeters) long and have a ridged or ribbed texture. They come in various shades of green and can be harvested when they are still tender and immature for the best flavor and tenderness.
Growing Conditions
Okra thrives in warm climates and requires a long growing season, usually lasting 60 to 80 days from planting to harvest. The optimal temperature range for okra growth is between 75°F and 95°F (24°C and 35°C). It is crucial to ensure that the soil temperature has warmed sufficiently before planting, as okra seeds prefer warm soil for germination.
Preparing Your Garden
Selecting A Location For Your Okra
Look for a spot in your garden that receives full sunlight for at least 6 to 8 hours a day. Okra plants thrive in warm temperatures, so select an area that is sheltered from strong winds, as they can damage the tall and delicate stems.
Preparing The Soil
Before planting okra, it’s crucial to prepare the soil properly. Start by testing the soil pH using a soil testing kit available at garden centers or through your local agricultural extension office. Okra prefers slightly acidic to neutral soil with a pH range between 6.0 and 7.0. If the pH is outside this range, you can adjust it by adding amendments such as agricultural lime to raise the pH or elemental sulfur to lower it.
Okra thrives in well-draining soil rich in organic matter. Prepare the soil by removing any weeds or grass and loosening it with a garden fork or tiller. Incorporate organic matter such as compost, well-rotted manure, or leaf mold into the soil to improve its structure and fertility. This organic matter helps retain moisture, promotes root development, and provides essential nutrients for healthy plant growth.
Planting Okra

Selecting the right time to plant okra is crucial for successful germination and growth. Okra is a warm-season vegetable and requires soil temperatures consistently above 60°F (15°C) for optimal growth, best is between 65- and 75 degrees F. Wait until all chances of frost have passed and the soil has warmed up before planting okra in your garden.
In most regions, this means planting okra after the last spring frost date. However, if you live in a colder climate, you can start okra seeds indoors 3 to 4 weeks before the expected planting date to get a head start. Transplant the seedlings outdoors once the soil has warmed up and all frost risks have diminished.
Space the seeds about 12 to 18 inches (30 to 45 centimeters) apart in rows that are 3 to 4 feet (0.9 to 1.2 meters) apart. Plant the seeds about 1 inch (2.5 centimeters) deep in well-prepared soil. Thin out the plants when they grow to around 3 inches tall.
Okra Care And Maintenance
Some okra varieties, especially the taller ones, may benefit from additional support to prevent the plants from bending or breaking under their own weight or due to strong winds. Consider providing support, such as stakes or trellises, for these varieties. Place the support structures in the ground early in the growing season, being careful not to damage the plant roots. As the okra plants grow, gently tie the stems to the support structure using soft plant ties or twine, ensuring they have room to expand and grow naturally.
Water
Maintaining proper soil moisture is crucial for healthy okra growth. Water the plants deeply, ensuring the water reaches the root zone. Aim to provide approximately 1 inch (2.5 centimeters) of water per week, either through rainfall or supplemental irrigation. Monitor the soil moisture regularly by checking the moisture level with your finger or using a moisture meter. Water when the top inch (2.5 centimeters) of soil feels dry.
Harvesting And Post-Harvest Tips
- Wear gloves. Okra has hairy leaves and spiny pods that can cause skin irritation.
- Harvest pods that are 1-2 days old. They should be between 2 and 4 inches long and it is when they’re the most tender and flavorful. Always harvest in the morning.
- Cut the pods off the plant, don’t pull or twist.
- Fresh okra can last in the fridge for 3-4 days.
- Blanch and freeze for longer storage.
- Allow some pods to fully mature on the plant and turn brown to harvest seeds for next year or beyond.

Troubleshooting Common Problems

- Yellow Leaves
- These can be caused by multiple factors including nutrient deficiencies, water stress, or pests. Inspect the plant and address each situation accordingly.
- Pest Infestations
- Aphids, Japanese Beetles, Stink Bugs, and Spider Mites can all be managed through natural methods like beneficial insects or organic pesticides like neem oil.
- Powdery Mildew
- Okra is susceptible to powdery mildew seen as white spots on the upper leaf surfaces, somewhat like flour. Sometimes you have to go as far as destroying the entire plant and not just the infected leaves to save the others.


